How To Fix Car Leaking Coolant – Calf -freezing can lead to problems for your vehicle if they are not treated immediately. A clearing system can lead to an overheating of motor that can cause serious damage and expensive repairs. Fortunately, the determination of a refrigerant leak can be an easy task if it is addressed methodically. In this article we take you in five simple steps to correct a refrigerant treck and ensure that your vehicle works smoothly and effectively. Do you need more help? Call the CrossRoads aid line for experts tips to determine your refrigerant leak and other car problems!
The determination of the refrigerant leakage is of crucial importance because it determines the repair method you use. Park your vehicle on a flat surface and let the engine cool completely. As soon as it has cooled down, open the bonnet and check the refrigerator, the hoses and the engine on visible leak signs. The usual leakage points include the refrigerator, refrigerator hoses, water pump and engine seals.
How To Fix Car Leaking Coolant

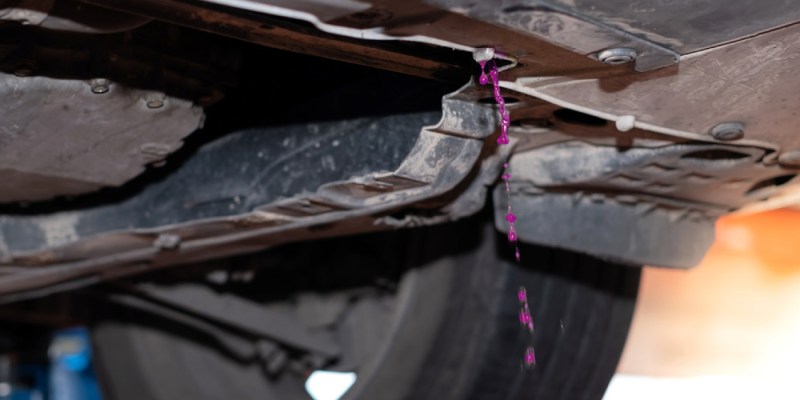
Search for coolant puddles under the vehicle or in this accessory. The coolant is usually light green, yellow or orange and makes it relatively easy to recognize. If you cannot find the leak visually, you should use a UV dye and a black light. Add the color to your refrigerant system, carry out the engine and then check with black light to locate the leak position.
What Causes Antifreeze Leaks?
Check for cracks, holes or loose connections in the refrigerator and in the hoses. Pay special attention to the clamps and joints of the tube, as they are often guilty of leaking. If the leakage source is still vague, it may be necessary for the pressure test. A printer tester can help you simulate the conditions under which the leak occurs and makes it easier to place the problematic area.
The documentation of the exact position and type of leak will help you in the next steps. Regardless of whether it is a small hole in a hose or a more important problem, e.g. B. a cracked refrigerator because the exact problem enables precise repairs.
As soon as you have found the leak source, the next step is to collect the necessary tools and spare parts for repair. The tools you need vary depending on the location and severity of the leak. However, the common elements include a set of keys, screwdrivers, pliers, drainage and possibly a cooler pressure test.
For components, you should match the specific element that leaves. If it is a hose, you need a replacement hose that corresponds to the brand and the model of your vehicle. For a cooler leaf, a cooler repair can be required, which usually contains epoxy or special type of sealant that are designed for correction small cracks and holes.
Coolant Leaking From Volkswagen Beetle
In some cases you may need replacement terminals if the existing worn or damaged. It is also a good idea to have an additional refrigerant to fill the system after completing the repair. Make sure that you use the correct refrigerant type for your vehicle because the use of the wrong type can lead to further problems.
Security is of the utmost importance when working in your vehicle. Wear protective gloves and safety glasses to avoid injuries from sharp ingredients or chemical exposure. A well -lit job also makes the repair process more smooth and safer.
Check your vehicle’s service handbook before repair. The manual often contains valuable information about the layout of the cooling system, the recommended processes and the specific torque settings for screws and clamps. Preparation with the right tools, parties and knowledge rationalizes the repair process and improves your trust.

The refrigerant drain is an essential step before some of the cooling system is repaired. First of all, make sure that the engine is completely cool to avoid burns or other injuries. Place a drainage container under the drain valve or towel of the cooler, usually on the bottom of the cooler.
Water Dripping From Under The Car: Causes And How To Solve Them
Open the drain valve slowly and let the refrigerant flow in the pan. If your vehicle does not have a drain valve, you may need to remove the lower cooler tube to let the refrigerant down. Be prepared that a considerable amount of refrigerant quickly comes out. So make sure that your pan is large enough to cope with the tension.
When the refrigerant flows off, take the opportunity to inspect his condition. The clean, intensive color coolant shows a well -preserved system, while the discolored or rusty refrigerant suggests potential internal problems. Sediments or debris in the refrigerant can indicate erosion or an impaired system that requires further attention.
As soon as the coolant is completely drained, close the drainage valve or repeat the lower tube of the cooler. Separate the old refrigerant according to local regulations because it is poisonous and harmful to the environment. Many car spare parts and recycling centers receive used refrigerants for a safe mood.
When the coolant is drained, you now have a clean and safe job to deal with the leak. Regardless of whether you replace a hose, repair or clamp a refrigerator to ensure that the system is empty, prevents leakage and enables a more effective repair process.
Signs Of A Coolant Leak
With the downloaded coolant and the source of leakage, it was time to repair or replace the damaged element. The approach you receive depends on the type and position of the leak. Here are some common scenarios:
When the leak is in a flexible cooler tube, loosen the clamps at both ends of the hose with a screwdriver or a wrench. Carefully collect the hose from the refrigerator and motor components. Check the hose for cracks, departments or bumps that could have caused the leak. Replace the hose with a new one and make sure that it corresponds to the specifications for your vehicle. Pull the new hose onto the accessories and secure it with new clamps to tighten it enough to prevent future leaks.
A cooler repair set can be effective for a small crack or hole in the refrigerator. These kits usually include special epoxy or waterproof. Carefully clean the damaged area by removing dirt or debris. Use the epoxide in the KIT to ensure that it completely covers the crack or hole. Let the epoxy to heal for the recommended time before continuing. In the event of larger or more complex damage, consider the refrigerator completely replaced, as this ensures more permanent and reliable repair.

Licks can also occur due to loose or damaged terminals. Check all the connections and clamps of the tube and put on the one that appears loose. When a bracket is eroded or broken, replace it with a new one. Make sure that all connections are safe to maintain the integrity of the cooling system and prevent future leaks.
Block Seal Liquid Copper Coolant Leak Fix (1109)
Lecks from the water pump or engine seals are more complex and may require professional support. If you suspect a leak of these components, it may be best to consult a mechanics, since repairing or replacing these components contains more complex work and more precise assembly.
With the careful treatment of this element responsible for the leak, you can restore the functionality of the cooling system and prevent further problems.
After completing the repair or exchange, it is important to properly refill and bleed the cooling system. First mix the corresponding type and the corresponding ratio of refrigerant and distilled water, as defined by the manufacturer of your vehicle. This ensures optimal cooling efficiency and prevents corrosion.
Slowly pour the refrigerant mixture into the refrigerator or the refrigerant so that it can flow through the system. Watch the level and add further until it reaches the recommended filling line. Start the engine and let it run for a few minutes. Then switch off and put the refrigerant level back, entering if necessary.
Causes Of Leaking Coolant Or Antifreeze
The bleeding of the cooling system is of essential importance for removing air pockets, which can lead to overheating and reducing cooling efficiency. Many vehicles have a bleeding valve near the thermostat housing or in the upper cooler tube. Open the valve and let every trapped air escape and then close it as soon as a solid coolant flow flows out. If your vehicle has no bleeding valve, you can achieve a similar result by running the engine with the radiator lid, but carefully with the hot refrigerant.
In the coming days, watch the refrigerant and the temperature knife to ensure that the system works properly and there are no leaks. If you are looking for signs of overheating or loss of refrigerants, you can accommodate residual problems at an early stage.
The proper refilling and bleeding of the cooling system is the last step to ensure that your vehicle works with optimal temperatures to prevent future problems and to expand the lifespan of your engine.

Defining a refrigerant leak is a manageable task with which you can save you from expensive repairs and have your vehicle function smoothly. By executing these five simple steps – detection of the leak, tools and component collection, refrigerant drainage, repair or replacement of the damaged ingredients as well as the repayment and bleeding of the system – you can effectively use your coolant and maintain your health. Regular maintenance and attention to problems with the cooling system ensure reliable performance and durability for your car. If you have a problem when correcting your refrigerant leak, do not hesitate to reach the crossing line for professional guidance.
How To Fix A Leaky Coolant Overflow Tank
MD Asifur Rahman is a professional SEO consultant at experts in healthcare, path, SaaS, local companies and E -Commerce. He is a professional SEO expert in Bangladesh with over 5 years of experience on pages, on the front, SEO technician, social marketing, marketing, marketing,